3/31/14

Back At It

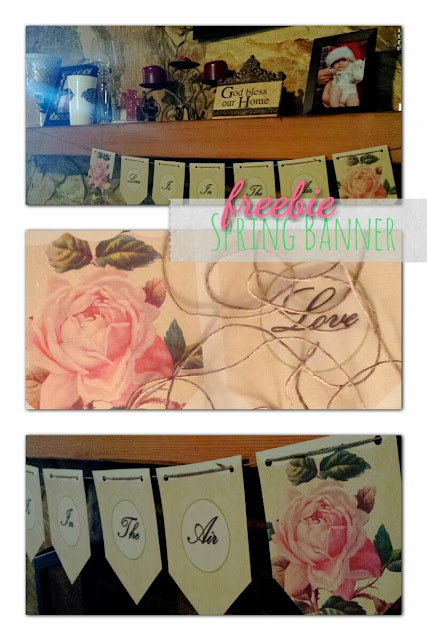
Good morning spring breakers. How is your Monday treating you? Being a teacher I don't think I will ever get used to this whole back to work thing lol. Anyway,  I wanted to give you all a heads up on what will be coming to you this Freebie Friday. Being particularly hard to wake up this morning,  I thought it'd be just perf!
These were a custom order but something very similar will be making its way to you very soon.
I get so excited for Freebie Friday that I have a ton of beautiful things lined up for ya.
Well,  enjoy!

3/28/14

Freebie Fridays

Happy Friday Readers,

For this Freebie Friday, I thought I'd share with you some pretty DIY Wall Art I made for myself. The hubs and I are house hunting, and of course being a DIYer, I cannot help but daydream {& occasionally drool} about all the beautiful things we are going to do to and create for that new home.

So here it is... my LOVE wall art.


Here is where you can download each letter: L - Heart - V - E
{This printable is in the format of an image so that you can print it out in any image size you want. I printed in a 8x10 as shown above.}


Here is an example of this beautiful printable and the planning process. I am hoping to fill the wall with a ton of other frames and fun stuff! {Also, don't mind my purple gray wall... the vision was totally different}


Any tips for me? I would love to hear them. Comment below!

XOXO, Crystal

3/25/14

Tubular Tip Tuesday

{Cutting a straight line}

I normally use regular scissors and just sit very still and very quiet as I am cutting a straight line but if you do not want to torture yourself, you can easily purchase a straight edge cutter from your local Hobby Lobby or online at Amazon.com that will help you with these edges.

You can find a Martha Stewart Rotary Cutter - HERE - [this will help you with not just straight edges, but curved as well]

Let me know how this tip helps!

XOXO,
Crystal

3/21/14

Freebie Fridays

Happy Friday Readers!

Here is a SUPER cute Freebie Friday, that I am completely obsessed with. I took a lot of time on it so I hope you use it, share it, & most importantly enjoy it. This one will definitely be a hit at your Spring time get-togethers.

 {SUPER SIMPLE} DIY Steps
1. Download - here -
2. Print [on cardstock in any color you want- remember whatever color you print it on will affect the final outcome; I chose a dark beige cardstock]
3. Cut out
4. Hang [first punch a hole at either corner of the top of each flag and then put string through it for easy hanging]
5. ENJOY!

With lots of love, hugs, and kisses, Crystal

3/18/14

{Soon To Be} Birthday Boy

Thinking about all the birthdays I have coming up in the year gets me all excited about my Husband's birthday in July. I know what you're thinking and we have a while till then but you see it's the first birthday I spend with him in our new home!

& look what I found!


Sorry I am pretty obsessed. It comes with a great step by step that you can find by clicking - HERE -

Thank you, Lil' Luna for this beautiful post! Me, and my readers appreciate it!

Can't wait to try this for my hubby! He's going to love it! 


3/17/14

DIY Easter Cross

With Easter around the corner I found this beautiful post by the super crafty and super cool Mackenzie over at Cheerios and Lattes. She gives a step by step of this beautiful Easter Cross. I will be making one for my house and posting pictures up soon. Send me yours to put up alongside mine!


Find the step by step HERE

3/12/14

{Post Update}

Here's a little post update: So, as I told you here, it was my sister's birthday and I made her cake for her day. I just wanted to share with you my personal experience with making my first Ombre cake, as I am NOT a baker, whatsoever, and am in no way making the statement that I am. This was VERY difficult for me, but being the resourceful person that I am {or that I try to be} I tried to simplify {as much as possible} what seemed like an impossible fete. Here's how...

First: I gathered some simple tools, and ingredients to make my life easier.
(1}Good old-fashioned PAM {2}Yellow Cake Mix {3}Bake Pan {4}Measuring Cups and lastly not shown here {5}Food Coloring

So first thing I did was make the cake mix {just followed the directions on the box}. I then equally separated the cake mix into different bowls and added food coloring to each bowl. To create the ombre look I added no food coloring to the first bowl, then one dab of red food coloring to the second bowl, to the third I added two dabs of red food coloring and 1 dab of neon pink food coloring, and then the last I added 3 dabs of neon pink food coloring. {needless to say it was VERY messy}


Then it was time to bake. I sprayed the bake pan with {A LOT of} PAM in order to make sure that it wouldn't get stuck. 


{Not so pretty, but}I quickly started layering all the mini cakes, and put white vanilla frosting in between each layer. Make sure to not leave the cake in the oven too long because since it is so little cake mix, it cooks very fast. I put more frosting towards the outer rim of each layer, so that the finished product would look even and pretty! haha. Take a look for yourself. What do you think?


It was delicious too!

XOXO, Crystal                    

3/10/14

Lucky {& Blessed}

Hi all wonderful readers,

HAPPY ST. PATRICK'S DAY!

Today I wanted to share with you this super cute and trendy printable for St. Patrick's Day. St. Patty's Day is not a day I normally get festive for but this sign by Holly over at Paisley Petal Events make it easy for me to get into the spirit.


Thanks, Holly! Such a trendy and adorable printable for this fun and and almost quirky holiday!


3/9/14

Disney Mom; Disney Dad

Out in WDW this weekend and thought I'd share this adorable Miss and Tell Creation.

My cousin and super faithful fan/client asked me to make her and her hubby Disney shirts for the first trip to Orlando with their brand new baby girl.

To create this I just simply purchased some red long sleeve tops and puffy paint. I then printed out the different images that I wanted to use. In this case,  I wanted to use the Mickey Silhouette. I printed it out and then cut it out. I used it as a stencil. {Just to make my life a whole lot easier}

3/7/14

Freebie Fridays

Who doesn't love a Freebie Friday. Can't help but have St. Patrick's Day on my mind with the green holiday being just around the corner. Check out these lovely FREE printables made by yours truly. Please enjoy!


Download Here:

3/5/14

Attention: Digital Artists

Hi readers!

I am so very excited about this beautiful find! The lovely Hannah over at We Lived Happily Ever After made some gorgeous Digital Chalkboard Frames. She even includes a tutorial that teaches how to turn your own artwork into a digital version, and it's VERY simple. All you need is white paper, a black pen (or marker), a scanner, and photoshop (-btw if you don't have photoshop, make a small investment and get a version, it will make your life SO much easier-).

Check out her frames below:


Thanks, Hannah! We are obsessed with this wonderful post! And, readers, check out this Friday for some free chalkboard printables using these awesome graphics.


Search This Blog