Sorry I haven't been writing too often. I have been so thankfully and gratefully busy with commissions for calligraphy and canvas art and THAT my friends makes me so excited! You wanna know another reason why I am so excited... March is National Crafting Month! So... go ahead... get your hands dirty and share pictures of your crafts with us!
Showing posts with label step by step. Show all posts
3/19/15
{March} RIGHT OVER
Hello Readers!
Labels:
calligraphy,
canvas,
chalk,
chalkboard,
diy,
download,
happy,
home decor,
mason,
step by step
1/20/15
Madison's Birthday Pupcakes
Hi all! Madison's birthday was last month and I decided to try something a little different. I am so excited about how they came out so I decided to post it onto the blog.
Yes, that means I made cupcakes for my pup. And she devoured them down to the last bite [she even ate half the paper wrapper too].
They were so easy to make. Here are the ingredients you will need:
- 1/3 Cup Milk
- 1 Egg
- 2 Tb Vegetable Oil
- 2 Tb Honey
- 3/4 Cup Flour
- 1/4 Cup All Natural Peanut Butter [I used Low Sodium Too]
- 1/2 tsp Baking Powder
- 1/2 tsp Baking Soda
- 1/2 tsp All Natural Vanilla Extract
Preheat the oven to 350 degrees Fahrenheit. Mix all the ingredients together and set on Stir for about 3 minutes. This will make sure that all the ingredients have mixed well. Then line your cupcake pan with about 4 liners. Spoon about the same amount of mixture into each one. Pop your pupcakes into the oven for about 15-20 minutes, and voila your puppy is ready to enjoy!
I am very particular with the things I give my baby. She's a westie, and westie's tend to have a lot of skin problems, the majority of which can be avoided by what they consume. For that reason I was skeptical to give her any pupcake, but these ingredients did just fine.
Here is the Peanut Butter I used. It is made by JIF.
I made pupcakes!
Yes, that means I made cupcakes for my pup. And she devoured them down to the last bite [she even ate half the paper wrapper too].
They were so easy to make. Here are the ingredients you will need:
- 1/3 Cup Milk
- 1 Egg
- 2 Tb Vegetable Oil
- 2 Tb Honey
- 3/4 Cup Flour
- 1/4 Cup All Natural Peanut Butter [I used Low Sodium Too]
- 1/2 tsp Baking Powder
- 1/2 tsp Baking Soda
- 1/2 tsp All Natural Vanilla Extract
Looks yummy, huh!?
Preheat the oven to 350 degrees Fahrenheit. Mix all the ingredients together and set on Stir for about 3 minutes. This will make sure that all the ingredients have mixed well. Then line your cupcake pan with about 4 liners. Spoon about the same amount of mixture into each one. Pop your pupcakes into the oven for about 15-20 minutes, and voila your puppy is ready to enjoy!
I am very particular with the things I give my baby. She's a westie, and westie's tend to have a lot of skin problems, the majority of which can be avoided by what they consume. For that reason I was skeptical to give her any pupcake, but these ingredients did just fine.
Here is the Peanut Butter I used. It is made by JIF.
Happy Birthday or Congratulations to your puppies! Let me know how it goes!
6/23/14
Tissue Paper Garland
First things first, what will you need? Well you need to determine how many tassles you want to make and what colors? In this case, we made 6 for the studio {2 pink, 2 black, & 2 white}. You are going to need a sheet of tissue paper for each. These sheets are Spritz brand and they are 16 1/2" x 24" {41.9 cm x 60.9 cm}. Spritz is available in the party section of any Target. You are also going to need string, scissors, and I love any opportunity to use Washi Tape, and this is one of those very opportunities.
You need to separate the tissue paper into individual pieces. You will then cut it down the middle {vertically} and then layer the two pieces, fold in half one way and then the other way.
Do you remember making fans in elementary out of paper? Well that same back and forth fold that you used then, you will use now. As seen below.
Then you are going to need to cut slits into your little folded tissue paper. I cut along the folds and then again in the middle. Keeping it folded, so that I don't need to cut so many individual slits. Each slit, leaving about 1 1/2" from the top of the paper. {Tip: For this step you need some really strong, sharp, new, good scissors.}
Then, it is very important that you separate {carefully} the strips you just cut. Be very careful. You want to completely separate them, and open up your tissue paper, like below.
You are now going to refold it. This step is important because it will give your tassel volume. {If only our hair were this easy, lol} Remember that back and forth fold we did earlier? Well do that again, with this larger piece of tissue paper. So that you get something like this below.
Then you are going to fold it in half over your string and wrap Washi Tape around it.
Let me know how this works for you? I tries to simplify as much as possible, but if you are still having some trouble, you can contact me about purchasing a custom one. Thanks!
Downloadable Fonts
Hi readers! Thought I would do a quick How-To. I realized that this is a necessity for any of your summertime printable projects.
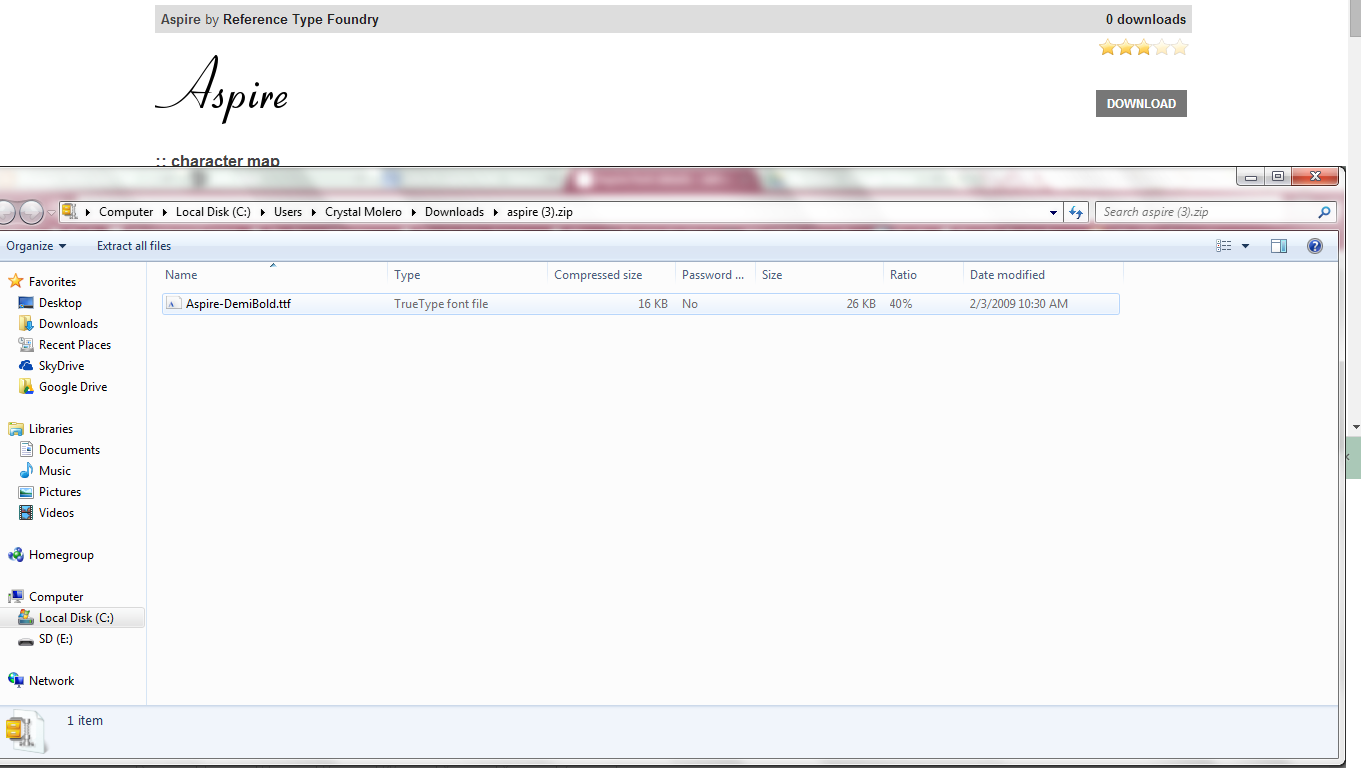
Have you ever opened an editable printable and see that the font does not match up? Annoying, right?! Well here is how you can download all these cool fonts into your windows computer, or laptop. Apple users can click here. {Thanks Fontspring}
So I love to use Dafonts.com. They have up to date fonts, and a very user friendly face. However you can google any font, or even things like "Mickey Mouse Font" and fonts should come up. This being said, your first step is to find your font.
Have you ever opened an editable printable and see that the font does not match up? Annoying, right?! Well here is how you can download all these cool fonts into your windows computer, or laptop. Apple users can click here. {Thanks Fontspring}
So I love to use Dafonts.com. They have up to date fonts, and a very user friendly face. However you can google any font, or even things like "Mickey Mouse Font" and fonts should come up. This being said, your first step is to find your font.
Okay so we found it! In this case we are downloading a font called "Aspire." {Heads up: It will be used for an upcoming editable printable on this site.} Now that you have found your font, next thing to do is click Download. Once you click download, your file should appear in your download list.
Okay, there it is, now click "Open". Once you click open you should not have to locate your file. Most of the time it is already located in your "Downloads" folder. However if this part doesn't work {it didn't work on my husband's laptop}using the same drop down menu as before {by right clicking on the file} you can click "Show In Folder" instead of "Open." Once you've located it, right click on it, and "Open With" --> "Microsoft Windows." It will open and all you have to do now is click "Install." Voila! It's done. Now just open your editable printable or any program installed on your computer if you wish to create your own printables!
Tip: If your program was already open and you don't see the font. You are going to need to save your work and then reopen the program.
Let me know if you have any questions in the comment box below. Enjoy!
Labels:
dafont,
diy,
download,
fonspring,
font download,
how to,
install font,
mac,
step by step,
windows
3/17/14
DIY Easter Cross
With Easter around the corner I found this beautiful post by the super crafty and super cool Mackenzie over at Cheerios and Lattes. She gives a step by step of this beautiful Easter Cross. I will be making one for my house and posting pictures up soon. Send me yours to put up alongside mine!
Find the step by step HERE
3/12/14
{Post Update}
Here's a little post update: So, as I told you here, it was my sister's birthday and I made her cake for her day. I just wanted to share with you my personal experience with making my first Ombre cake, as I am NOT a baker, whatsoever, and am in no way making the statement that I am. This was VERY difficult for me, but being the resourceful person that I am {or that I try to be} I tried to simplify {as much as possible} what seemed like an impossible fete. Here's how...
First: I gathered some simple tools, and ingredients to make my life easier.
(1}Good old-fashioned PAM {2}Yellow Cake Mix {3}Bake Pan {4}Measuring Cups and lastly not shown here {5}Food Coloring
So first thing I did was make the cake mix {just followed the directions on the box}. I then equally separated the cake mix into different bowls and added food coloring to each bowl. To create the ombre look I added no food coloring to the first bowl, then one dab of red food coloring to the second bowl, to the third I added two dabs of red food coloring and 1 dab of neon pink food coloring, and then the last I added 3 dabs of neon pink food coloring. {needless to say it was VERY messy}
Then it was time to bake. I sprayed the bake pan with {A LOT of} PAM in order to make sure that it wouldn't get stuck.
{Not so pretty, but}I quickly started layering all the mini cakes, and put white vanilla frosting in between each layer. Make sure to not leave the cake in the oven too long because since it is so little cake mix, it cooks very fast. I put more frosting towards the outer rim of each layer, so that the finished product would look even and pretty! haha. Take a look for yourself. What do you think?
It was delicious too!
XOXO, Crystal
2/21/14
Freebie Fridays
Hi fellow crafters! Here is your Freebie Friday!
With Spring around the corner I thought you would love this beautiful FREE printable pendant banner.
Here are some step by steps:
With Spring around the corner I thought you would love this beautiful FREE printable pendant banner.
Here are some step by steps:
First Step: Download!
Second Step: Get your supplies
Third Step: Cut & Fold
Keep Going!
You're Almost Done!
Then tape it to string, put it up, & enjoy!
2/7/14
Freebie Fridays
Hi all! This is going to be exciting! Let me be the first to introduce you to Freebie Fridays! With Valentine's Day coming up, I thought it would be great to provide all of you lovelies with a Valentine's Day Freebie.
2/1/14
Snowman Smash
Great for rainy Winter days, this very simple craft turned game can be created by the little ones.
What you will need:
● Styrofoam Cups {here we used bowls}
● Permanent Markets {crayons can be used as well}
● Styrofoam Cups {here we used bowls}
● Permanent Markets {crayons can be used as well}
And presto! This is fun because the kiddos can be as creative as they want.
When you're done, stack them and make some paper balls [snowballs] and try and knock all the snowman's pieces over.
Happy crafting!
Subscribe to:
Posts (Atom)